Showing posts with label How to. Show all posts

Wednesday, June 20, 2012

Slow Cooked Mexican

In this household, Mexican food is a favourite. I have seen Linc annihilate a whole 2 bowls of chilli con carne without barely breathing.

On Saturday I tried this Chicken Fajita recipe by Stacey Makes Cents in my slow cooker.

1 brown onion, sliced
3 capsicums, sliced
600-700g boneless chicken breast
½ cup chicken stock
½ tsp salt
2 tbsp cumin
1 ½ tsp chilli powder
Lime juice

Tortillas
Sour cream
Cos Lettuce
Avocado
Corn


Place your onion and capsicum at the bottom of your slow cooker, chicken breast on top.
Pour over stock, sprinkle on your seasoning and spices, and then give it a really good squirt lime juice.


Now I did double the mixture because I had my parents for dinner. I cooked it for 6hrs on high. So this could easily cook on high for 4hrs or as Stacey suggest low for 8hrs.


When it's cooked the chicken just falls apart. You can tear it up with a couple of forks or just a little pressure from my serving spoon was enough for it to break up. You definitely have to serve it with a slotted spoon. There are so much juices. (You can use them later for a bases for another recipe). You might also like to play with the chilli and cumin levels a bit to suit your own tastes.

I like to serve it up in bowls for everyone to help themselves and build there own tortillas.

I also did an accompanying Mexican rice adapted from this recipe by The Pioneer Woman Cooks.
I took the heat out of the recipe a bit (and the fact that I've never seen anything like Rotel here) by substituting the can of Rotel for a can of chopped tomatoes and half a chopped green capsicum.


2 Tbsp Canola Oil
1/2 Brown Onion, Chopped
3 Cloves Garlic, Minced
2 cups Basmati Rice
1 can Chopped Tomatoes
1/2 Green Capsicum, Chopped
1 can Whole Tomatoes
1/2 cups Salt Reduced Chicken Stock
1 1/2 cups Salt Reduced Vegetable Stock
1 tsp Cumin
1 tsp Turmeric
1 tsp Salt
Fresh Coriander, Chopped

Heat oil in a large skillet.
Add onions and garlic, then cook for 3 to 4 minutes.
Reduce heat to low and add rice and garlic. Stir constantly, making sure the rice doesn’t burn. Cook over low heat for 3 minutes.
Add both cans of tomatoes and chopped capsicum. Stir to combine and let cook for 2 minutes.
Finally, add broth, cumin, turmeric and salt, and bring to a boil. Reduce heat to low, cover, and simmer for 10 to 15 additional minutes or until rice is done. Add more liquid as needed; rice shouldn’t be sticky.
Just before serving, sprinkle on freshly chopped coriander over the top.
Posted by on November 11 2009

 I hope everyone enjoys this Mexican feast!!

Monday, May 28, 2012

Easy Lunch: Grilled CBE Sandwiches

Long time readers of my blog will probably know that I've had real issues with getting the VIPs to eat egg, all stemming from them not being exposed to it at a young age. Mans kept breaking out in hives. Slowly Mans grew out of it and convincing them that eggs were A-OK became a bit of a mission.

One of the things I decided we would do is have eggs for lunch once a week. I've done everything from scrambled eggs to 'eggs and soldier bread'. "Eggy Bug Bread" became one of their favourites. In the early days. it was still familiar enough for them to nibble on it but tasting enough like egg that they would get used to the taste.


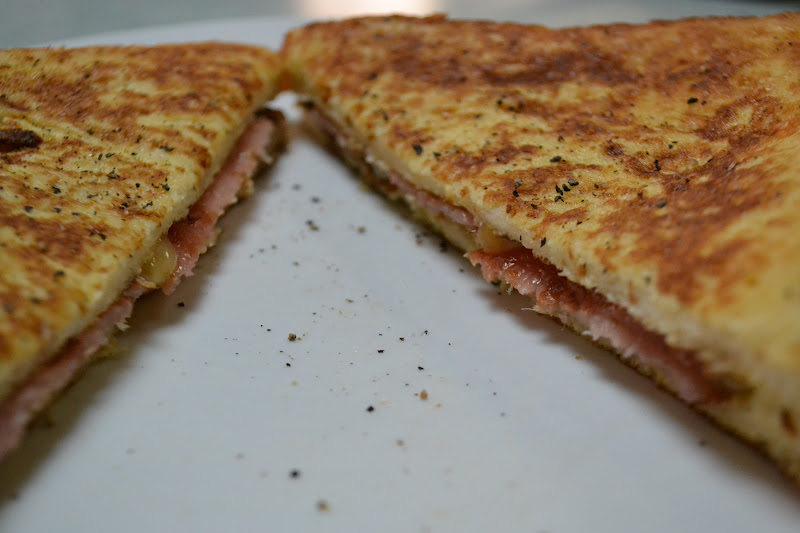
When Baker Bob joins us for lunch on 'Egg Day', I make up Grilled CBE Sandwiches.

6 Free range eggs
1 1/2 tbsp milk
8 slices of grain bread
4 pieces of cooked Low Fat bacon rashers
250g Grated Low Fat cheese
Salt
Fresh cracker pepper
Canola spread
  • Whisk the eggs, milk and a little salt and pepper in a flat bottomed bowl. I actually use a deep lunch box.
  • Get everything ready next to the oven. Your egg mixture, bread, bacon and cheese.
  • Heat a frying pan and melt a little canola spread in the frying pan.
  • Lay the bread flat in the egg mixture for 5-10secs, flip and soak the other side.
  • Lift it up and let it drip a bit before quickly moving it across to your frying pan.
  • Do the same to a second slice of bread.
  • Fry until brown and flip.
  • On one slice of bread, sprinkle on some shredded cheese and lay your bacon on top.
  • When golden brown on the second side, place the bread on top of the bacon and transfer the sandwich to a plate.
  • Sprinkle with a little bit of salt and heaps of fresh cracked pepper.


If you want you can make up the sandwiches before dipping the whole sandwich in the egg mixture and frying off but the bread doesn't soak up the egg as much. It makes about 4 sandwiches and it's great served with a simple fresh garden salad.

Saturday, March 10, 2012

Handy Tips

I found this on Pinterest and just had to share. There are some useful tips on there.
I think the most important is number 5 under coffee filters.
Don't want to waste that wine!


Wednesday, March 7, 2012

My Experience With Cake Mix Cookies

I discovered this idea over at Frill In The Hills.

Feel like some some cookies but can't be bothered making them from scratch. Or maybe your missing the flour? Do you have a packet cake mix on hand.

Cookies made with packet cake mix! They stay a lovely moist, doughy consistency on the inside.

I used a Betty Crocker strawberry cake mix today.


It's just 1 packet of cake mix
2 eggs
125g softened butter
and enough plain flour to make a sticky but firm dough (add milk if you add too much flour, I used 1/2 cup for this packet mix)

Mix, roll into balls and bake on grease proof paper at 180°C for 10-15mins

This is the same way I made the dinosaur footprint cookies for Eva-saurus' Messy Dinosaur Luau


When they had just come out of the oven I pressed one of the VIPs' dinosaur toy's foot into the top of the biscuit. (This cake mix was Greens Moist Chocolate Cake)

How To: Dinosaur Fossils

The idea for the dinosaur fossils at Eva's birthday party I picked up of Pinterest (I love that place).


What you'll need:
Small plastic or rubber dinosaurs - How ever many you want.
I bought a tube of 36 dinosaurs for $2.50 from Kmart

1 1/4 cup of dirt
1 1/4 cup of flour
3/4 cup of salt
1/2 sand
Water
A bucket to mix it all in

This mixure will make up about 8-10 dinosaur fossils, depending on the size of your dinosaurs
You need enough water to make it a clay like consistency.

Mix all ingredients
Mold the mixture around your dinosaurs
Allow to dry.
I placed them on some newspaper outside and they still took almost a week to dry completely. I kept flipping them because the moisture would gather underneath the fossils.


 Then it's just a matter of hiding them, sending out a search party and once found, tapping them with a hammer to make them crumble apart.


They were such a hit that I've been trying to think of ways of interpreting them into other party themes and, as the original source suggests, they would be a fun activity to do with your preschooler 'just because'.